Forum sponsored by:

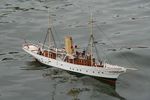
61' Barnett class lifeboat
a total scratch build of one of the RNLI's largest lifeboats, of the 1920's
| neil howard-pritchard | 30/07/2022 12:53:20 |
 2810 forum posts 4323 photos | You'd think that after using 2 part epoxy such as Zap and otherts, for the past 30 odd years, I'd be able to mix two equal parts and glue my frames together......BUT NO!!!
|
| neil howard-pritchard | 30/07/2022 14:30:17 |
2810 forum posts 4323 photos | All frames now glued and levelled to give a straight deck, showing a lovely sheer to the hull.
|
| neil howard-pritchard | 30/07/2022 16:58:43 |
2810 forum posts 4323 photos | All raised cabin gratings now been stabalised and and sanded smooth on my belt sander. They look well on the deck in the approximate position they will eventually sit in. Which brings me to the next part.............and that is the gluing and fitting of the deck. But there in lies a small cockup, and a reference to my school days. I was ABSOLUTELY USELESS at science in any form and although my problem stems from my fear of the subject it really wasn't a problem with the boat other than blanking out certain points, but I ,as an escape, blame it on science. The shortest distance between 2 points is a straight line, and why a boat/ships length is measured between perpendiculars, and as such I measured the length of the deck I cut, between those two points. I DIDN'T take into account the sheer of the deck, which ultimately alters the length of the deck. So! I am going to have to cut the deck into two pieces. It will eventually make it easier to fix in place the 2 halves and line them up, and I will be able to infill the small gap in the centre of the boat.............but it could also weeken the structure unless I reinforce it properly.........we shall see, eventually.
|
| gecon | 30/07/2022 17:28:25 |
| 755 forum posts 659 photos | This really is a huge piece 'maritime woodwork' Neil. It's going to look magnificent! -and huge George |
| neil howard-pritchard | 31/07/2022 17:14:15 |
2810 forum posts 4323 photos | Posted by gecon on 30/07/2022 17:28:25:
This really is a huge piece 'maritime woodwork' Neil. It's going to look magnificent! -and huge George i hope so George...........and once the hull is made for the plug, and moulded, all the hard work will be done, as almost everything else, fittings wise is done. the cabin itself will be a plug and moulds from solid obeche, unless the plug from the 51' Barnett that i still have can be modified to take a mould. |
| neil howard-pritchard | 31/07/2022 17:17:20 |
2810 forum posts 4323 photos | I once asked Mike Pendlebury a friend and fellow modeller about fittings on his scratch built lifeboats and where he got the ideas from, before the invention of the 3d printer was made available at cheap enough price for modellers to buy one.
|
| neil howard-pritchard | 31/07/2022 17:19:24 |
2810 forum posts 4323 photos | i will endeavour to do that, Alberto .
|
| neil howard-pritchard | 01/08/2022 11:01:19 |
2810 forum posts 4323 photos | Iast night I made the coxs'ns pedatal and grating plus the platform for the compas stand. The frame for the grating was made from mahogany, and the rest from 1/16th ply in two payers to stop any warping..grain of the two layers going at right angles to each other.
|
| neil howard-pritchard | 01/08/2022 11:19:05 |
2810 forum posts 4323 photos | Obviously, because the deck sheets were cut on the flat, and the deck actually follows the sheer of the boat, the deck was too short, and so had to be modified. First, supports were glued to the cross frames to support the front section of deck, fore and aft, and then left overnight. this morning i put glue on to all tops of the frames and supports, using aliphatic quick grab wood glue, and then, starting at the rear end of the front section, mating up to the fore part of the aft deck, where the deck is at its widest. Using framing pins, and starting at the rear, i pinned the deck to the frames, finally using G cramps to hold the final part of the foreward part of the deck to the frames and supports. This will be left for most of the day to thoroughly set and dry. There is then a small strip about 25mm wide to fit at the bow section and put an upstand piece of ply to finalise the rased section of the fore peak. Once that has all set by tomorrow, i shall be able to start filling in between the frames, using strips of obeche i bought a couple of weeks ago. Thats when the fun begins.
|
| neil howard-pritchard | 01/08/2022 18:08:06 |
2810 forum posts 4323 photos | Like building a wall, one layer at a time, starting with one brick at a time.
|


Please login to post a reply.
Magazine Locator
Want the latest issue of Model Boats? Use our magazine locator link to find your nearest stockist!
Sign up to our Newsletter or Special Offers
Support Our Partners


Competitions
Shopping Partners


Article Database

Member Contributions
Join a Club!
Distributors of Model Boats for our overseas readers
Frequently Asked Questions
MPBA Information Leaflets

Highlights
 Make sure you never miss out on the latest news, product reviews and competitions with our free RSS feed
Make your own contribution to the Website

We welcome well written contributions from Website members on almost any aspect of Model Boating with a particular emphasis on practical hints, tips, experience and builds.
In order to maintain a consistent standard and format, all suggestions should first be sent to me by Personal Message for approval in principle. Only a very limited amount of time is available for editing contributions into a suitable format for placing on the website so it is important that the material is well presented, lucid and free from obvious spelling errors. I think it goes without saying that contributions should be illustrated by appropriate photos. I shall be happy to give advice on this.
The Member Contribution area offers space for short informative mini articles which would not normally find a place in Model Boats magazine. It is an opportunity for Website Members to freely share their expertise and experience but I am afraid that virtue is its own reward as there is no budget to offer more material recompense!
I look forward to receiving your suggestions.
Colin Bishop - Website Editor
 Register
 Log-in
Model Boats Magazine
- Landing Craft Mini PLan
- Riva Aquarama Build
- Scale Colour, Sound & Speed

Digital Editions
- Access your digital editions

Subscribe Now
- Every issue delivered right to your door

Renew Now
- Save & never miss an issue!

All Forum Topics > Scratch build > 61' Barnett class lifeboat