Forum sponsored by:

IOM Boxkite
A refit story
| Tim Rowe | 18/02/2021 09:10:41 |
 580 forum posts 577 photos | A few years ago I gave an IOM to a very good friend. It was an ebay purchase and the photos turned out to be an honest picture of the condition of the boat ie basically OK but some tidying to do. At the time I did not know it was a Boxkite (Graham Bantock design) but the idea was that my friend and I could could sail with each other with me using my Topiko which is another Graham Bantock design. For those who don't know, Graham is a champion sailor and owns SailsEtc which is a go-to place for model yacht fittings, sails and accessories. |
| Ray Wood 2 | 18/02/2021 16:08:05 |
 3205 forum posts 1142 photos | Hi Tim, The IOM racing boats always looked an expensive way of sailing ! I recall chatting to Kenny Binks 10 years ago at the lake at Eastbourne and asking him how much the hull & deck for his state of the art Yellow Canary from Australia was and him replying £1500 !!!! then more recently they are sailing Brit Pop's same sort of cost ?? My experience of model yacht racing with an RG65 is they take it very seriously and shout at each other alot Where as the Thames Sailing Barge racing is much more sedate, I'm sure your restoration of your friends boat will be first rate Regards Ray |
| Tim Rowe | 18/02/2021 18:12:57 |
580 forum posts 577 photos | Hello Ray If you are sailing at International or top National level then you are going to need a recent design and it will cost a lot of money as you say. At club level it isn't so expensive as there is an active second-hand market and it is still possible to build yourself and be competitive. If you are careful you can build where you still need corrector weights and the rigs are not too expensive. Ideally you will have a carbon fin and rudder along with a long torpedo keel weight. Those cost a bit I admit.
|
| Tim Rowe | 20/02/2021 10:28:03 |
580 forum posts 577 photos | I checked over the hull of the Boxkite (Now named Too Easy after a Beneteau my friend owned) He wanted a modern, non serif font for the name so it was condensed to "2EZ". Suits me fine as here are less letters to cut out. The hull was in very good shape with just some very tiny cracks at the fore and aft end of the keel slot. Internally everything was fine so I decided not to worry about them. The main problem was the deck paint and lack of deck patches. |
| Eddie Lancaster | 20/02/2021 12:53:12 |
| 849 forum posts 644 photos | Hi. Tim, I am using the Hitec HS-785HB with the arm in my Boxkite and that seems to be coping well so far. I will be using the same servo but with the winch drum in the two Nimbus hulls as these boats are 3” narrower than the Boxkite. I was going to follow the same placement of the servos as they are in the Boxkite, but after reading your points on weight distribution I will put the sail control servo as it is shown on the plans, alongside the fin box. It is already in this position in the balsa planked hull. Regards. Eddie. |
| Tim Rowe | 20/02/2021 13:07:48 |
580 forum posts 577 photos | Hi Eddie I think it makes things a lot easier. If you use a "buggy" type battery you can fit it in a pot and have room for the RX above it. I use Ni-Mh 1600 mAh 6v batteries. It also means you can have nice short leads. Tim R |
| Eddie Lancaster | 20/02/2021 18:26:57 |
| 849 forum posts 644 photos | Hi.Tim, thanks for the info. Eddie.
|
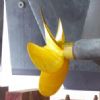
| Tim Rowe | 21/02/2021 09:45:46 |
580 forum posts 577 photos | The hull had been spray painted and had a good gloss. I wasn't planning a complete re-paint but when peeling off the deck paint (literally) some of the topside paint came off too. In fact
This is how it came off leaving not a trace behind. I have no idea what the black coating was but it was quite hard and perfectly ok, or would have been if it had been prepared properly. In the end this was the only big surprise. Tim R |
| Tim Rowe | 21/02/2021 09:55:14 |
580 forum posts 577 photos | This shows the the position of the battery.
Right aft under the big patch and held don with a cable tie.
Again under the big patch. I am not familiar with this model of servo. The sealing rubber was damaged and it was a bit noisy so I have swapped it out with a Futaba S3001. This is the design position of the servo but destined for the centre compartment. This meant making a new longer link tube but I had some allow tube that was slight larger in diameter but much thinner walled so the new one was stiffer and lighter. Tim R
|
| Tim Rowe | 25/02/2021 15:34:15 |
580 forum posts 577 photos | The paint coming off the hull was a shame because they sprayed finish was very good and quite a high benchmark for me to restore. Anyway we got back to to the undercoats that were sound and took out a few lumps and bumps from the inside to make things a bit tidier and a few grams of weight.
This was the original and far from matching the profile at the bow. It was acting more like a crumple zone than a bumper so I took it off and threw it away before I was tempted to cheat. Slippers courtesy of the local Chinese shop and very necessary on a marble floor in a Mallorquin winter. |


Please login to post a reply.
Magazine Locator
Want the latest issue of Model Boats? Use our magazine locator link to find your nearest stockist!
Sign up to our Newsletter or Special Offers
Support Our Partners


Competitions
Shopping Partners


Article Database

Member Contributions
Join a Club!
Distributors of Model Boats for our overseas readers
Frequently Asked Questions
MPBA Information Leaflets

Highlights
 Make sure you never miss out on the latest news, product reviews and competitions with our free RSS feed
Make your own contribution to the Website

We welcome well written contributions from Website members on almost any aspect of Model Boating with a particular emphasis on practical hints, tips, experience and builds.
In order to maintain a consistent standard and format, all suggestions should first be sent to me by Personal Message for approval in principle. Only a very limited amount of time is available for editing contributions into a suitable format for placing on the website so it is important that the material is well presented, lucid and free from obvious spelling errors. I think it goes without saying that contributions should be illustrated by appropriate photos. I shall be happy to give advice on this.
The Member Contribution area offers space for short informative mini articles which would not normally find a place in Model Boats magazine. It is an opportunity for Website Members to freely share their expertise and experience but I am afraid that virtue is its own reward as there is no budget to offer more material recompense!
I look forward to receiving your suggestions.
Colin Bishop - Website Editor
 Register
 Log-in
Model Boats Magazine
- Landing Craft Mini PLan
- Riva Aquarama Build
- Scale Colour, Sound & Speed

Digital Editions
- Access your digital editions

Subscribe Now
- Every issue delivered right to your door

Renew Now
- Save & never miss an issue!

All Forum Topics > Sailing Models > IOM Boxkite